Pensacola Magazine | Cover story | 2020 | print and digital

By Kelly Oden I Photos by Guy Stevens
“You are an explorer. You understand that every time you go into the studio, you are after something that does not yet exist.”
– Anna Deavere Smith, Letters to a Young Artist
For many artists, inspiration begins with a spark, an idea, a vision—and although they may have a fairly clear sense of what they’d like to create, that sense can, and often does, change during the process of creation. Perhaps that is one of the things that make creating art so enticing— the idea is tested through the controlled chaos of process, and even the artist can’t always predict the exact final outcome.
Each January, we focus our issue of Pensacola Magazine on one or more aspects of the arts. For this issue, we focus on the artist’s process by bringing you into the studios of four talented local artists—a printmaker, a blade smith, a glassblower and a jewelry designer—to walk you through a very abbreviated version of their processes. Sometimes, seeing a final work of art, the non-artist can be unaware of the time and effort each unique piece takes to create. We hope you find this glimpse inside the artist’s process as interesting and as educational as we did.
Wayne Meligan / Bladesmith
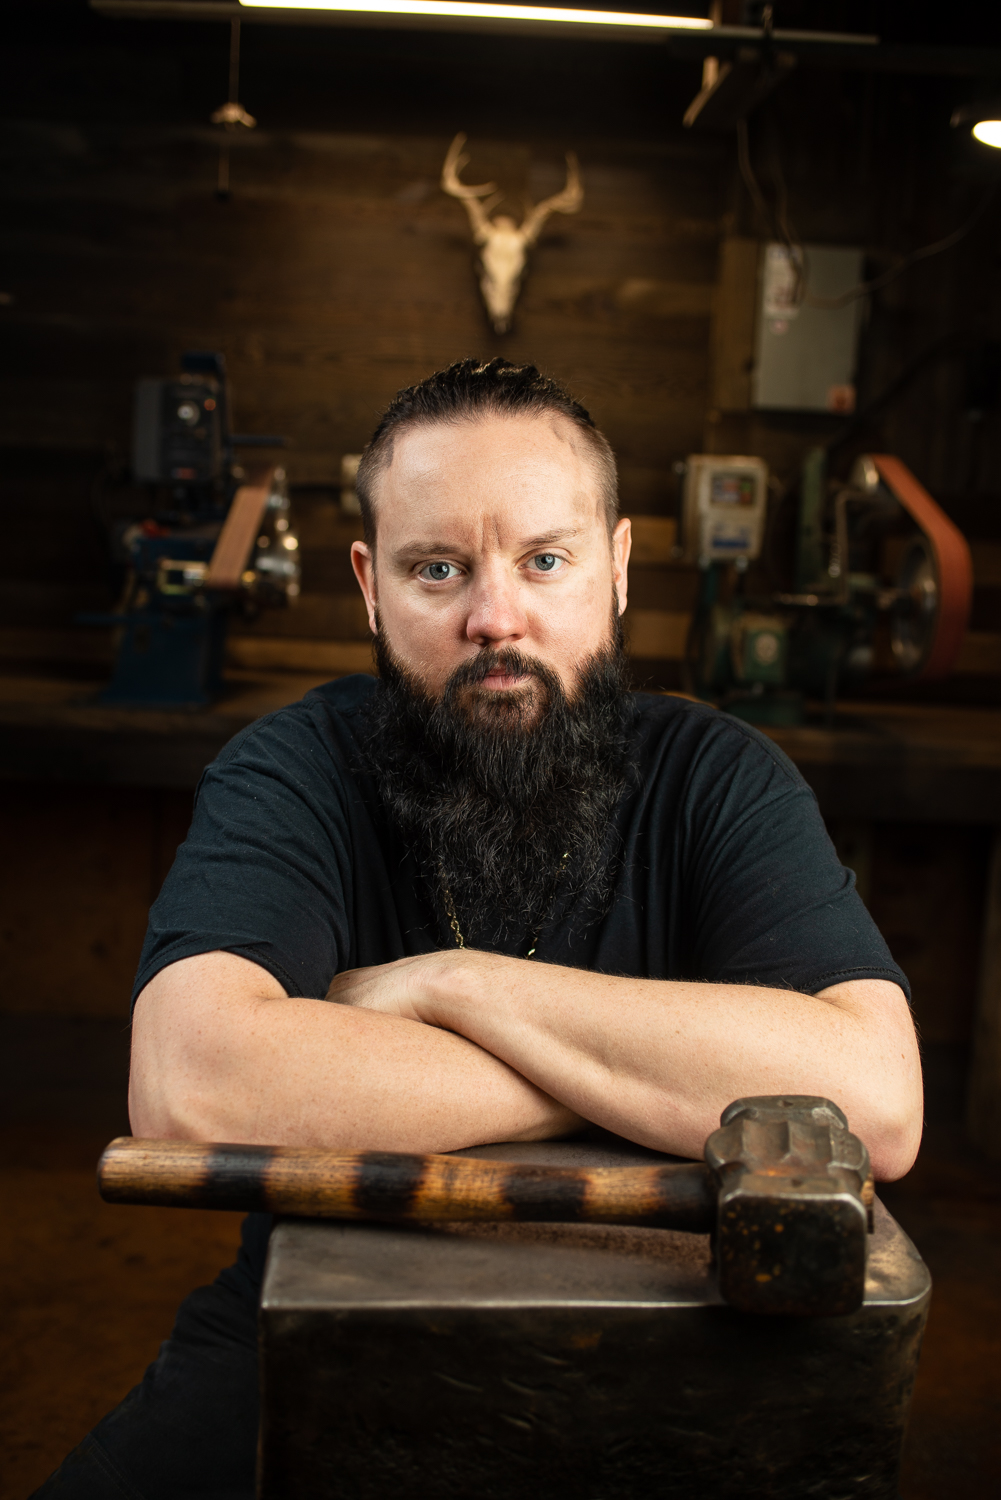

Wayne Meligan spent 12 years as a critical care nurse before he found his true calling as a blade smith. Born and raised in Pensacola, Meligan always enjoyed working with his hands and in the arts.
“I’m an artist,” Meligan said. “I never knew exactly what I wanted to do. I had my hands in several different things— carpentry, woodworking and even some metal fabrication. One day, something told me to get an anvil and to build a forge.”
In April of 2017, he did just that. Meligan purchased the tools he needed and created his first blade. “It came really easy to me,” he remembered. “It felt like that was what I was meant to do. It just felt too natural, and it was fantastic. It was everything that I love. I love the outdoors and sportsman stuff—hunting, fishing and camping. You use knives or tools for all of that, so to be able to forge my own blades is epic.”
Meligan has been going nonstop ever since. “At first, I gave them away to family and friends,” he said. “Then I started selling them for about the cost of the production. Once I had all the right heattreat equipment and I knew that I was putting out a solid blade with good geometry, a good heat treat and a good fit and finish, and then I knew I could actually sell them. Now, I sell them at fair market pricing. I sell everything online to people all over the world. I don’t sell anywhere else because I can’t keep anything in stock. The problem is—this isn’t a production company. Everything I make is hand made and hand forged from start to finish. It takes hours and hours for every blade that I do. People get frustrated because I run out, but I am only one person.”
After I had been forging blades for a couple months, my mom said, ‘You know, your great granddaddy used to make blades.’ Then it all kind of came back to me. He died before I was born, but I remember when I was really young being over at his house, and I remember seeing all these big knives. He was a really big guy. He lived out in Molino, and he worked at the sawmill. He’d use those old saws and turn them into blades. I’ve actually got a couple of his blades. It’s pretty cool to see that blade-smithing was in the blood.”
After garnering a following on Instagram, Meligan was featured in Blade Magazine. Later, he was featured on the TV show Knife or Death, and in 2019, Meligan competed on the History Channel’s, Forged in Fire. Meligan competed against four other blade smiths from across the country. Meligan, just two years into his blade-smithing career, won the competition.
For Meligan, his passion more than makes up for his relatively short time as a blade smith. “Just because I’ve only been doing this for 2.5 years, don’t discredit me because the amount of hours I’ve put into this has given me the experience of someone who has been doing it 10 plus years,” he explained.
As for his creative process, Meligan likes to let the steel to lead the way. “Everything that I do, I like to keep it organic,” he explained. “I may say set out to make a chef knife or a machete. I’ll have a general idea in my head of what I want to do, but I hate putting things on paper. I feel like it takes away from the creative process. I like to get the steel hot, start forging it and as I envision it and as I’m hammering, it kind of comes to life. I feel like my best work is done that way. It’s a true artistic approach.”
While Meligan works with a variety of steel types— including recycled saws and vehicle springs—he prefers using high carbon steel.
“There are two types of steel you can use to make a blade, he said. “One is high carbon steel and the other is stainless steel. Stainless is good. It has a lot more chromium in it, so it doesn’t rust. I use carbon steel a lot because that’s the true steel. That’s the steel they had back in the day.”
Interest in Meligan’s blades has been tremendous, and he doesn’t see that slowing down anytime soon. “Knife making is really making a come back,” he said. “Everyone is really getting into the handmade products—the quality and craftsmanship of that. When you buy a blade, you’re not just buying a tool or a knife, you’re buying an heirloom, and you’re also buying a little piece of that artist.
The Process
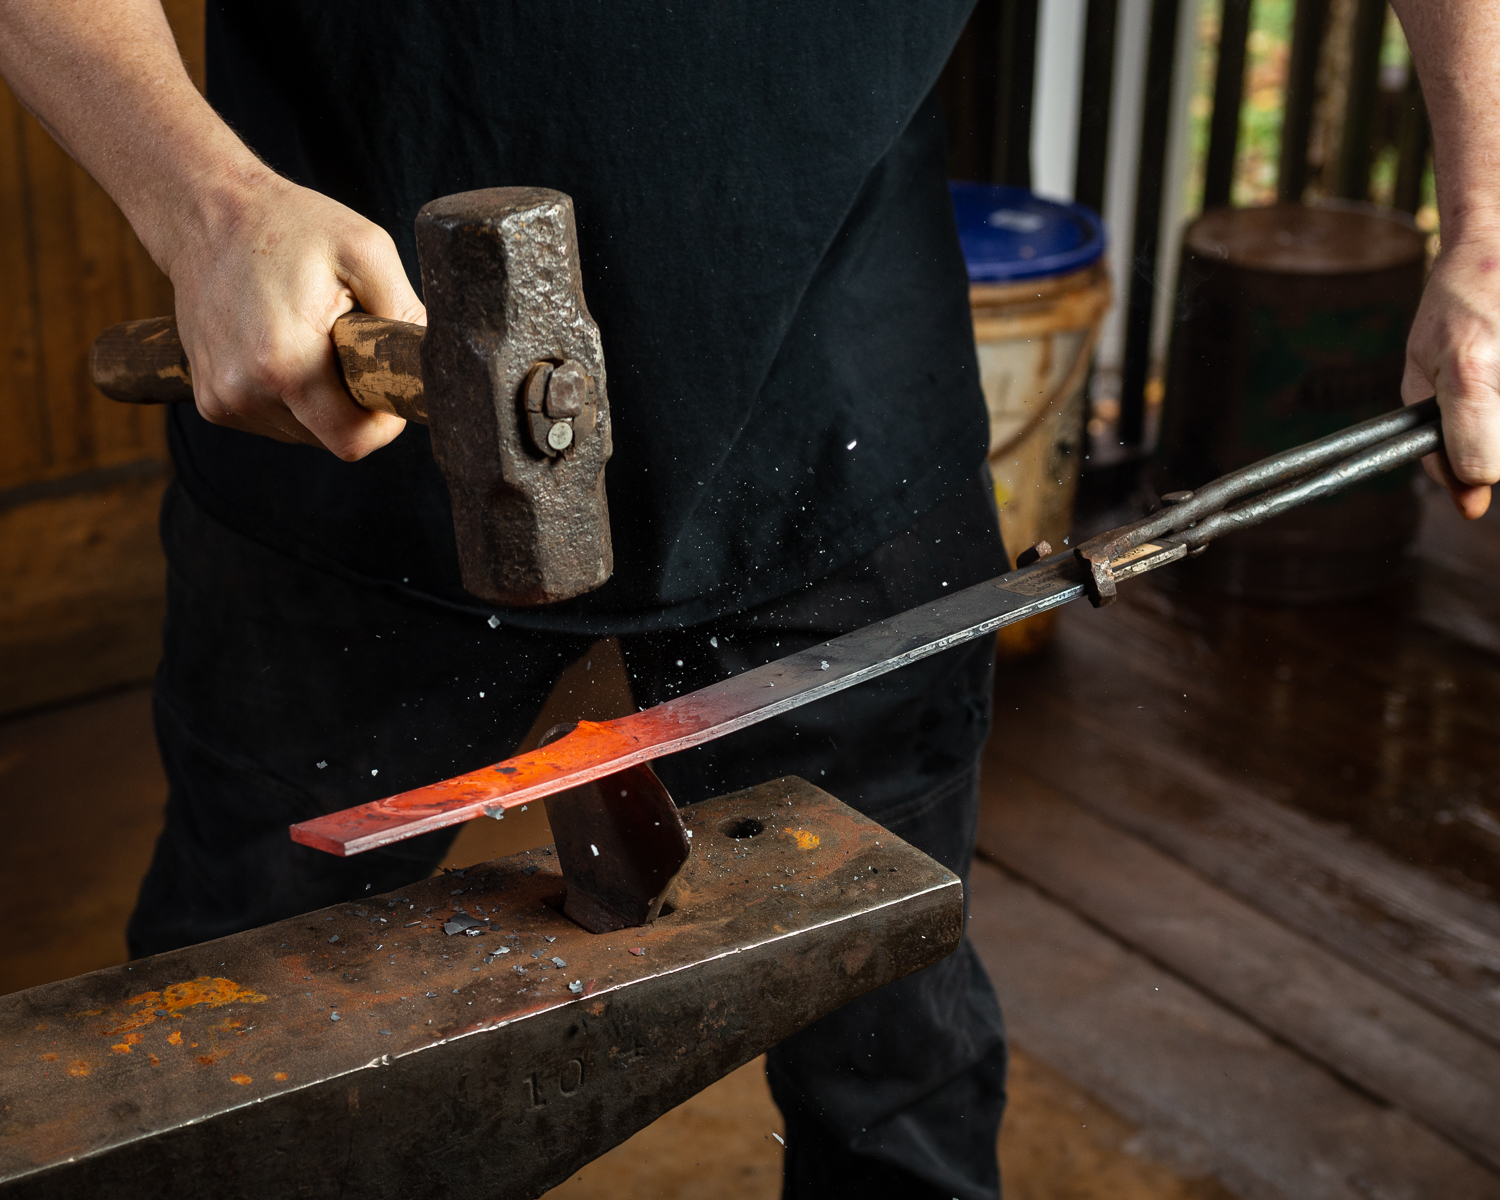
1. The first step for Meligan is selecting his steel—usually high carbon steel. He then heats the steel in a gas burning forge which reaches temperatures over 2,000 degrees—hot enough to melt steel. Meligan reads the colors of the steel to determine its temperature. He wants the steel hot enough that it won’t cause micro cracks while hammering but not so hot that all the carbon is burning out, and he doesn’t want to melt the steel.
Once the steel reaches forging temperature, Meligan uses a power hammer and a hand hammer on the anvil to rough shape and hammer out the blade. That could take several hours to days depending on type of blade he is making and what type of steel he is using.
2. After the basic shape of the blade is formed, he uses a grinder to clean up the shape of the blade and to fine tune the bevel work.
3. The next phase is the heat treat, which Meligan sees as one of the most important parts of the blade. For the heat treat, he doesn’t use the forge because he can’t gauge the temperature with only color. That’s too much left to chance, so he uses an electric kiln because they will heat to the exact temperature they are set for and they will heat for the exact time period they are set to. Heating the blades takes away the stresses of the forging and reassembles all of the molecules in the steel.
After hours of the heat treat cycle, Meligan austenizes the steel by bringing it up to austenitizing temperature, which is about 1,500 degrees. Next, he pulls the blade out of the kiln and puts it into oil to quench it. The quench drops that temperature down really rapidly by pulling the heat out of the blade. What this does is convert the austenite to martensite, which is the hardest form of steel.
4. After the tempering, Meligan works on the final grinds, being very careful not to overwork the steel. To keep from tempering the steel further, he grinds for a few seconds and then cools in water. This process is repeated until he gets the grinds almost to the final thickness. From there, he hand sands the blade for hours depending on the type of finish he wants.
Once the blade is finely sanded, he begins to make the handle. Meligan uses primarily hardwoods, which he glues to the handle, along with copper or brass pins for the physical hold.
Meligan also makes his own leather sheaths and scabbards. The average blade takes between 12 and 20 hours, while specialty blades could take weeks to a month to complete.
To see more of Wayne Meligan’s work, visit thepirateforge.com.
Kreg Yignst / Printmaker
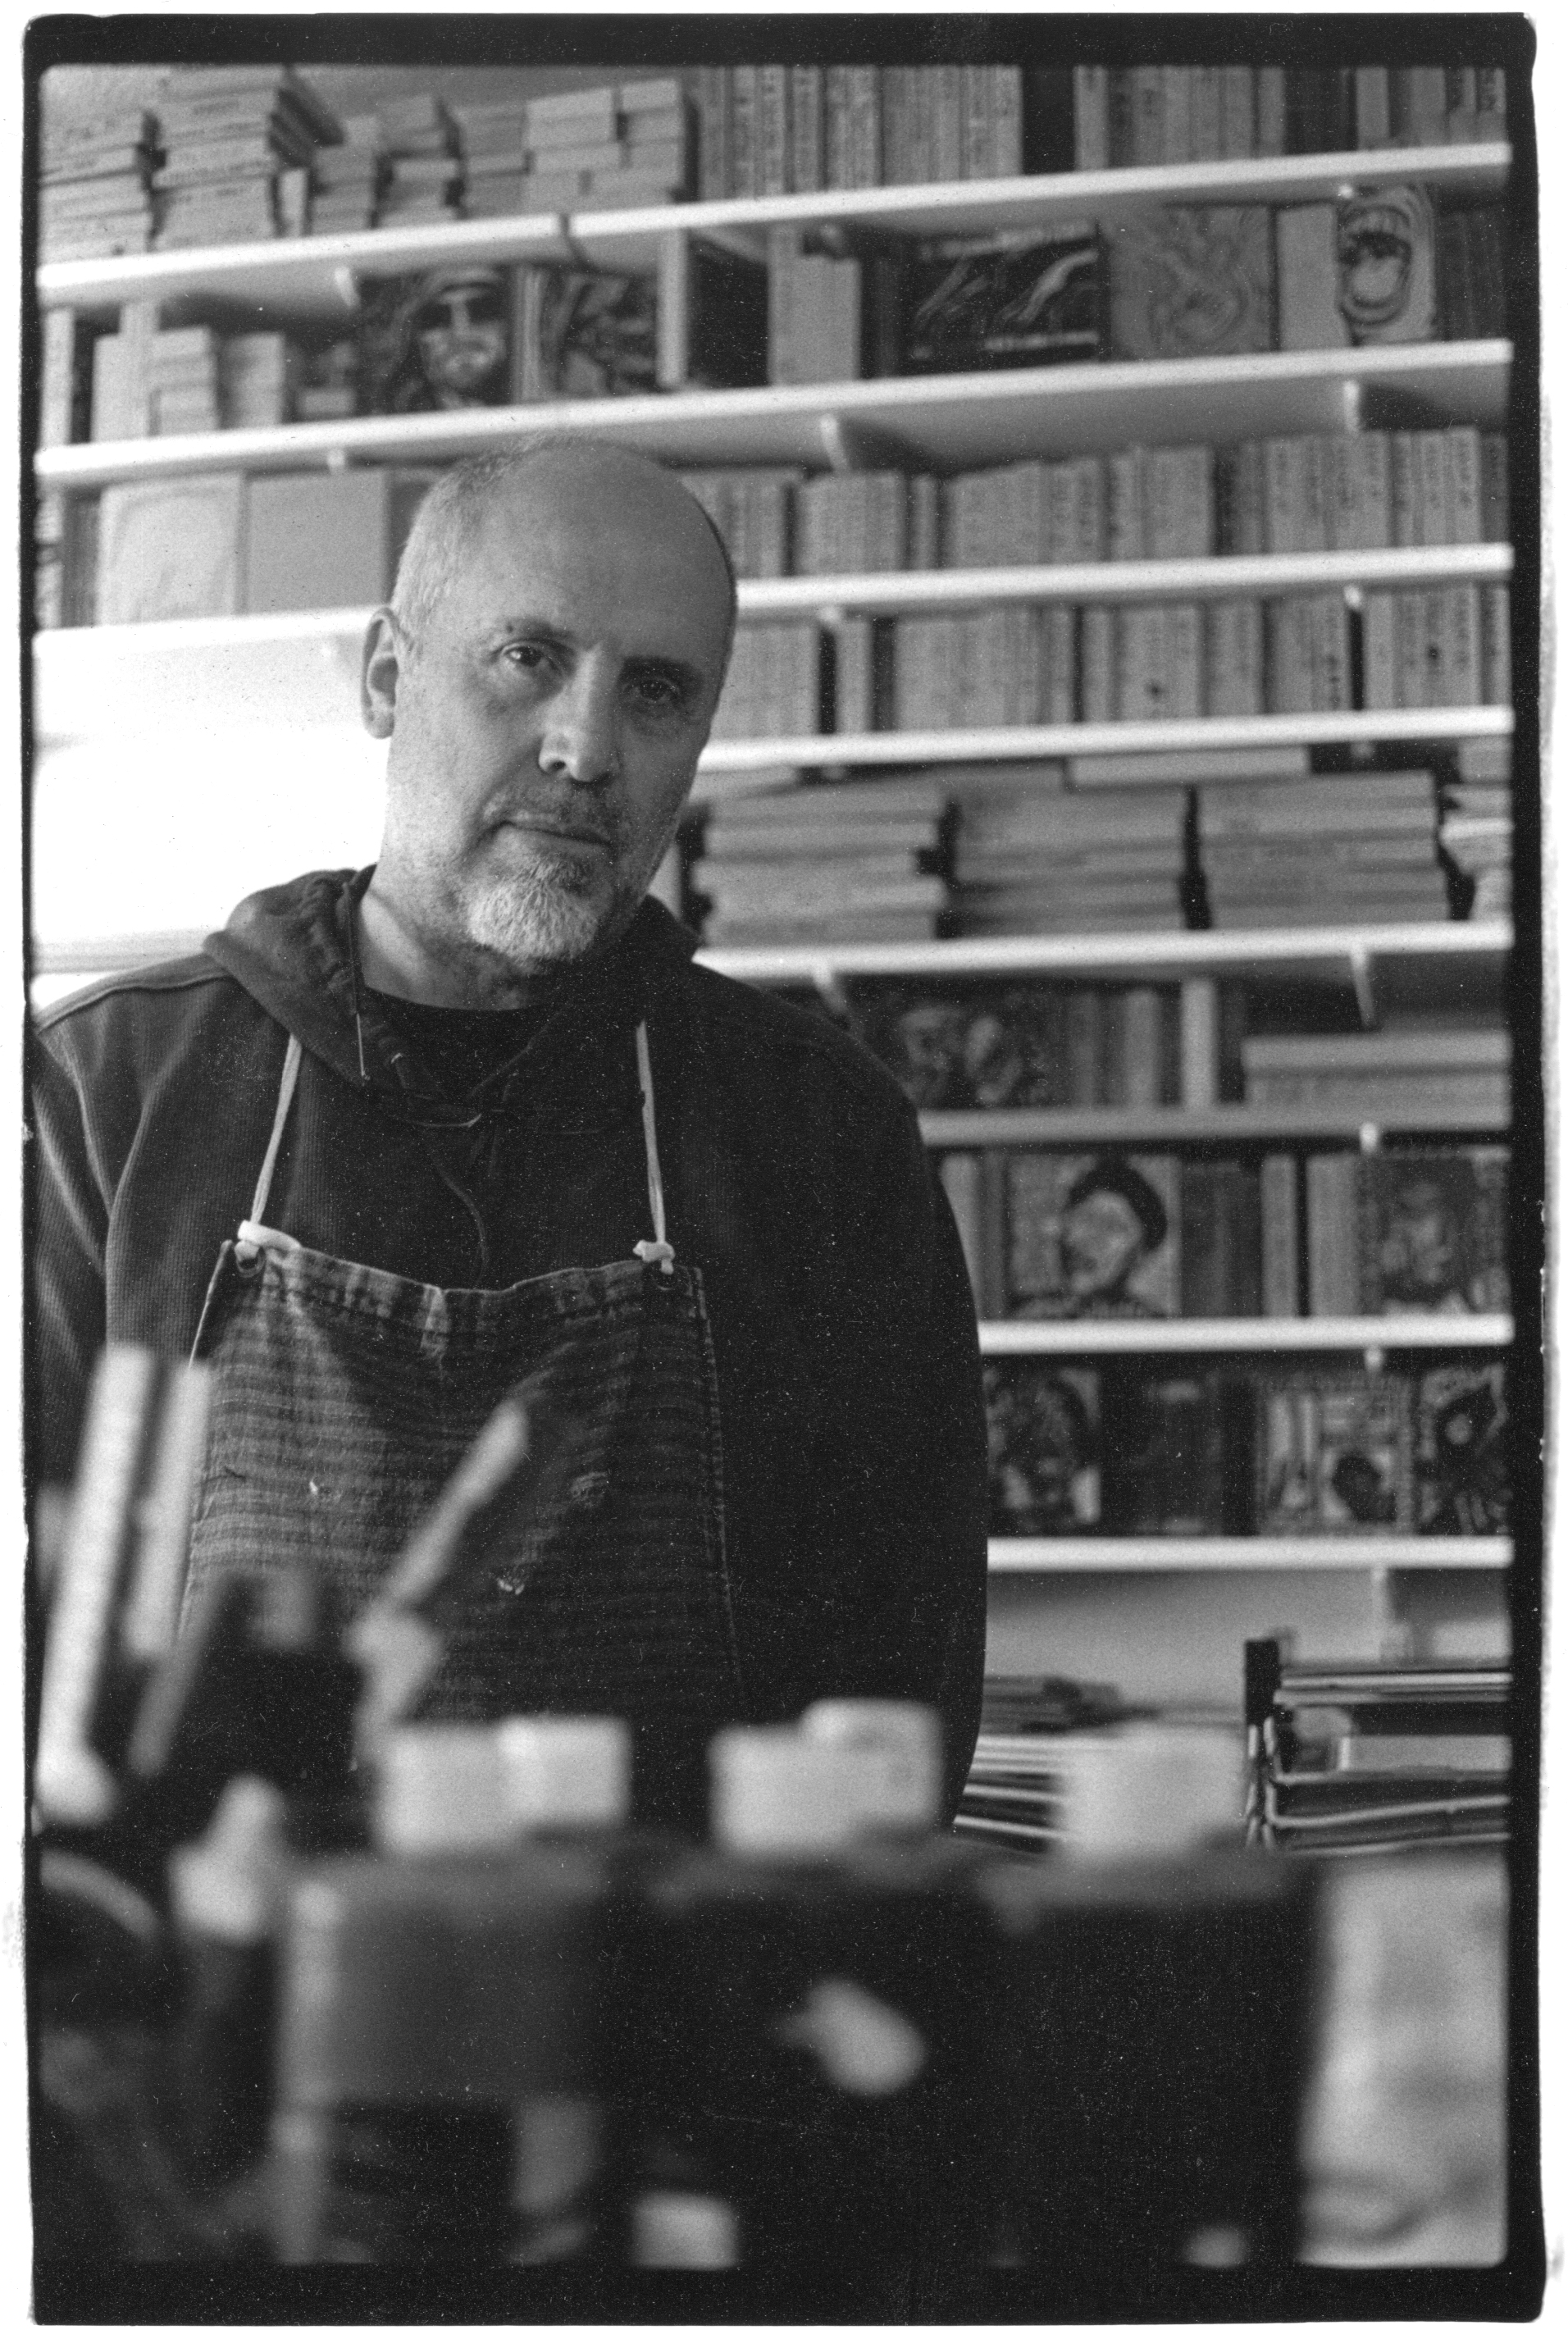
Originally from the Chicago area, Kreg Yingst received his BA in painting from Trinity University in San Antonio, Texas, before returning to Illinois to teach and obtain his MA in painting from Eastern Illinois University.
While teaching, Yingst began thinking about making art full time.
“As kids growing up, you’re told a lot of the time that you just can’t do that,” Yingst said. “For some reason, at some point, you begin to believe them—as if they would know. But, really there’s never been a better time in our culture to make art because it’s so visual.”
Yingst took a sabbatical to focus on different ways one could make a living as an artist.
“I was gathering information for my students,” he explained, “but in the process, I realized that I could do this. It was kind of a lifelong dream. I was able to get my work into a very good gallery in Chicago and started doing some of the art fair circuit and looking into grants and residencies. I resigned from teaching in 2003.”
Yingst and his wife moved to Florida, where he found his paintings didn’t have quite the market they did in Chicago. “I was doing some weird stuff back then,” he said. “It wasn’t for everyone.” This is when he turned a serious eye toward printmaking.
“I’ve always kind of been a narrative artist. It’s figurative as well, but I’ve always been interested in story, and that’s come out in my work forever,” Yingst explained. “I was very inspired by the work of printmakers Lyns Ward and Frans Masereel, who worked in the 1920s and 30s. They had done entire books that were called woodcut novels. They didn’t have any words. They were all images. You would read it, image after image, and it was probably the precursor to the graphic novel or the comic, but it didn’t have words. I thought it was interesting that I could be reading it and someone in another country could be reading the same story. It kind of transcended the language barrier. That kind of grabbed me into the narrative. I also like the fact that I could own this thing and hold it and know that Ward had actually made this work on it by hand. It wasn’t removed. It wasn’t a digital reproduction. There wasn’t any in-between person. It went straight from the artist to me. I started working with printmaking at that time. I had dabbled in it with my students, but it was all new to me.”
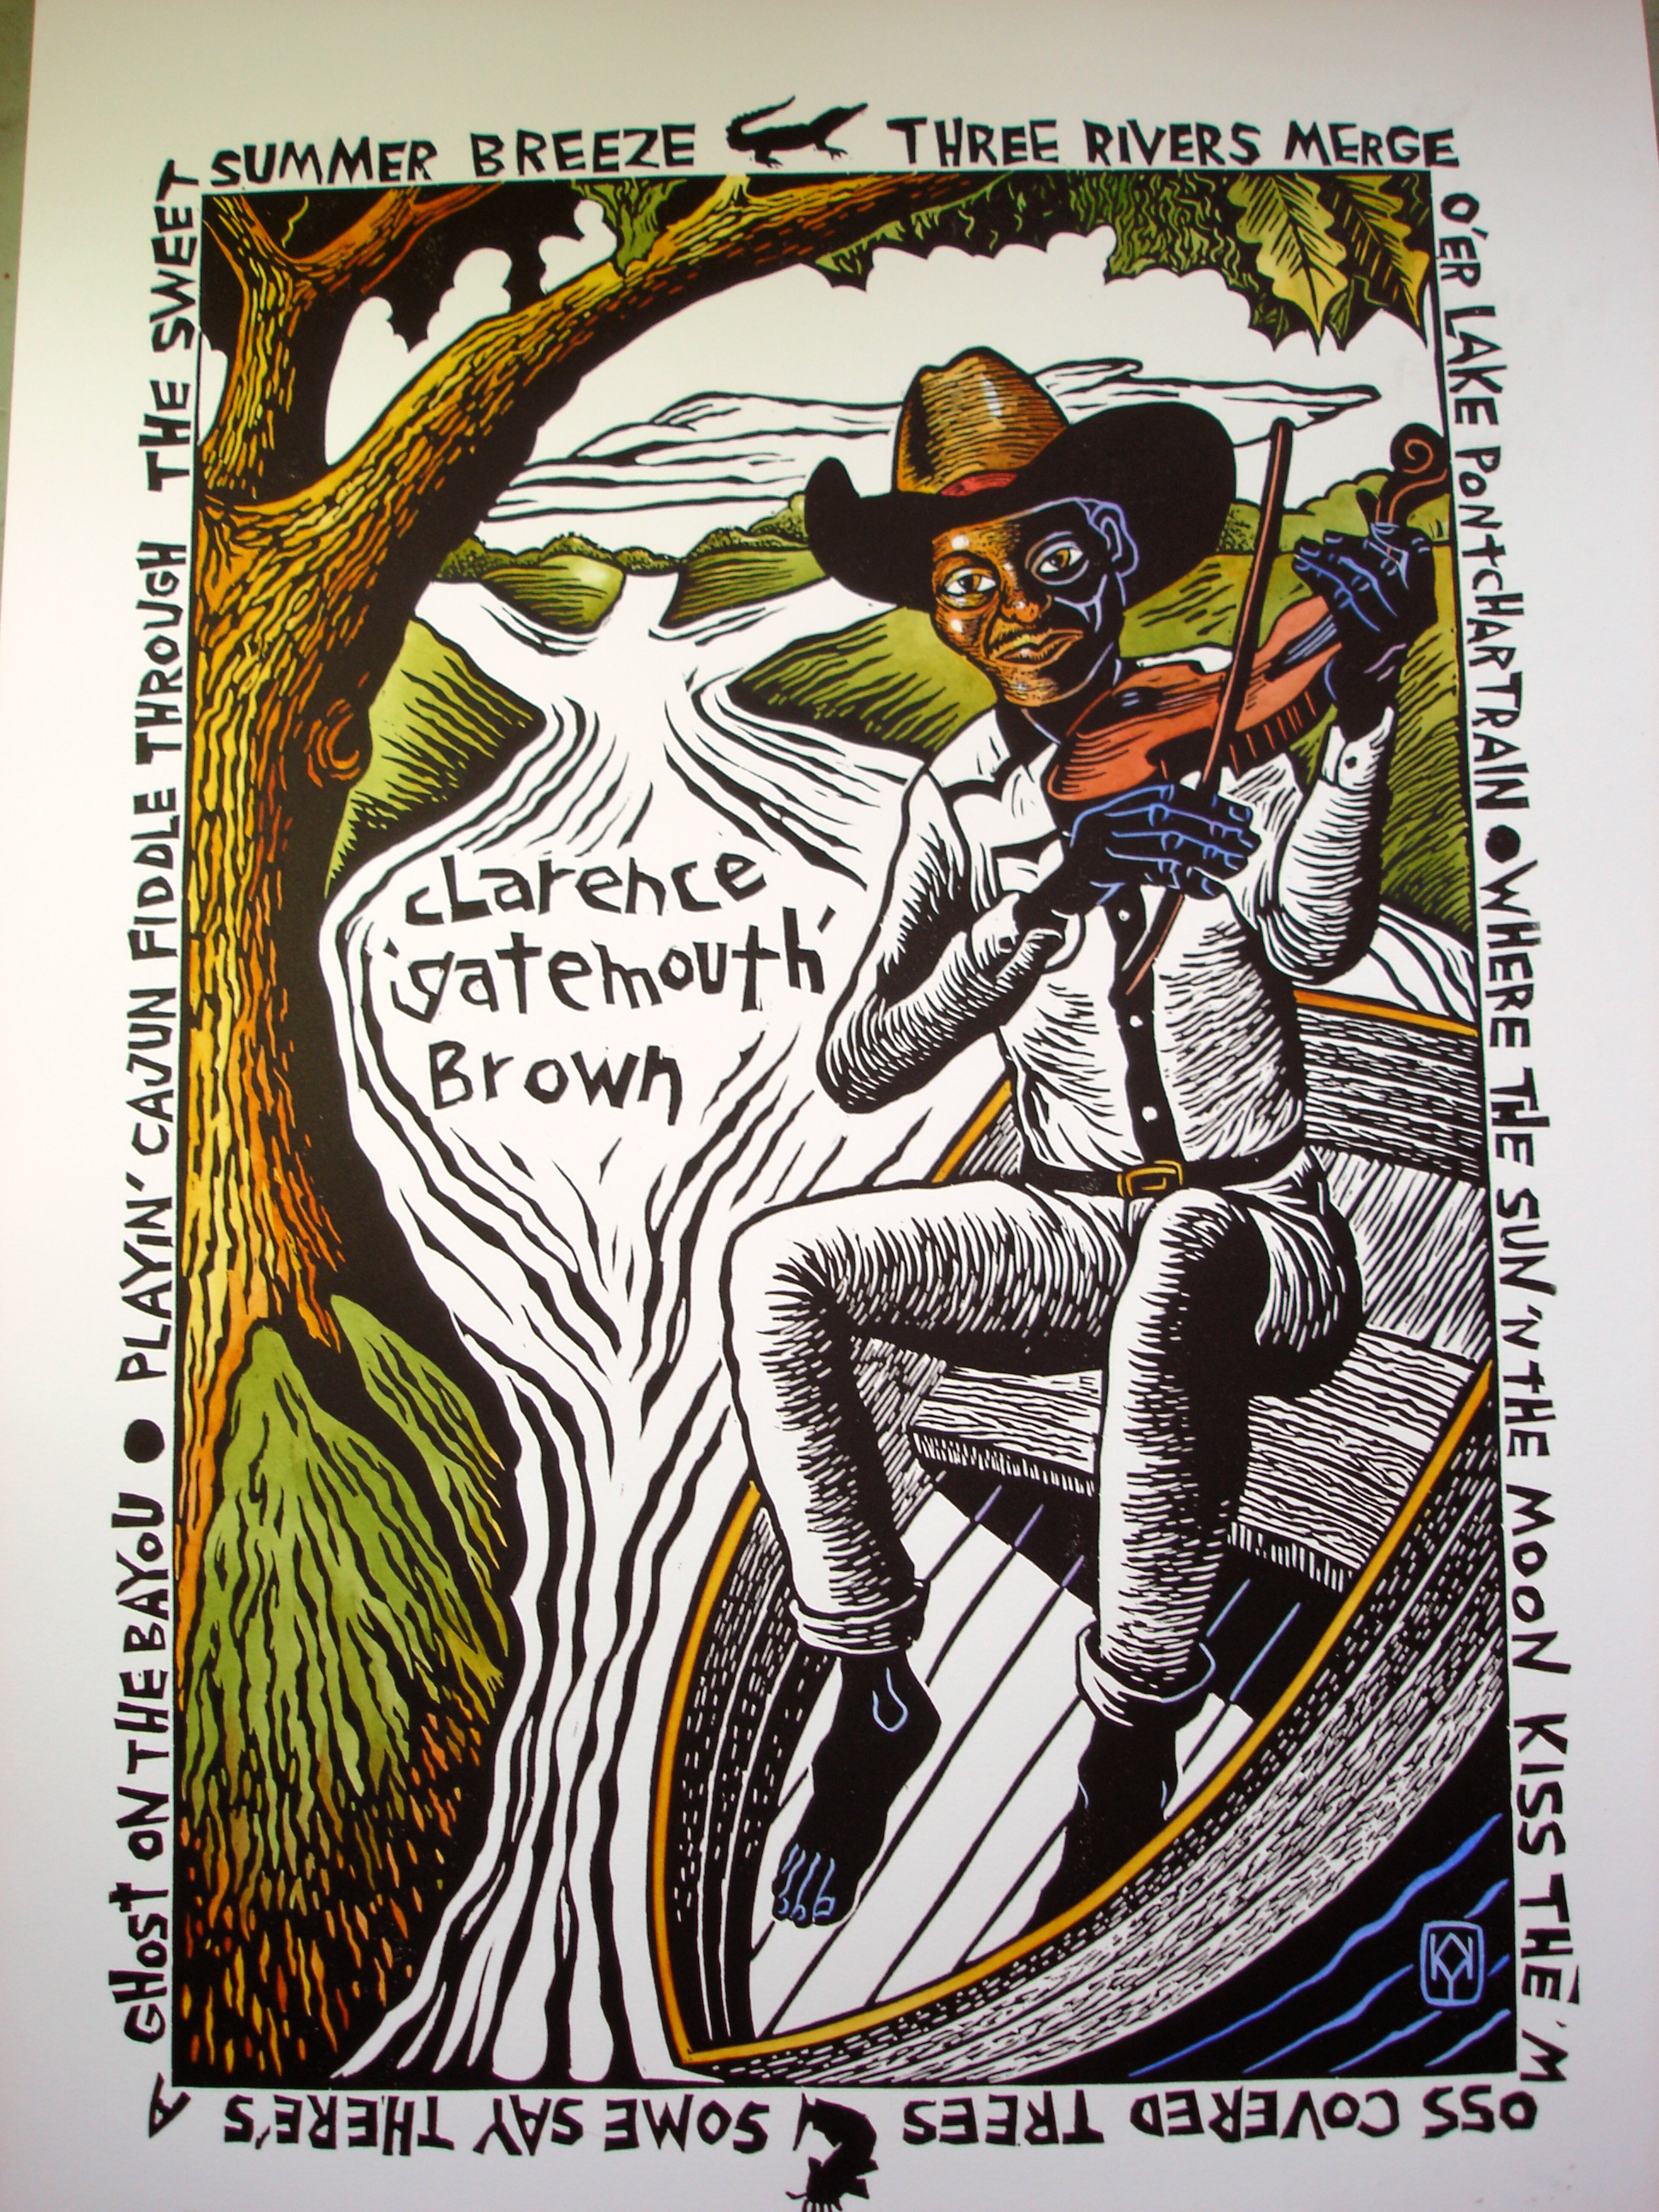
Yingst often works thematically—moving from blues, jazz and country musicians to classic rock, historical figures and even a series of biblical Psalm interpretations. Yingst typically carves his images into linoleum mounted on a wood base or occasionally into the wood itself. Depending on the desired outcome, Yingst prints on a variety of papers including cherry and mulberry. He uses a vintage Showcard sign press rescued from an old Sears to print his work. Although he typically carves narrative elements into the piece, he occasionally uses letters from his vintage letterpress font catalogue to overlay text on his images.
̋Printmaking is so different from painting. It’s almost like you are tapping into two opposites sides, but you’re not. You’re tapping into the creative, but there are two different things you are considering. With painting, it’s an additive process, so I am layering and layering. I can continue to change and alter. With printmaking, once you’ve started carving, you better have it figured out. To me, it’s more mathematical.
The Process
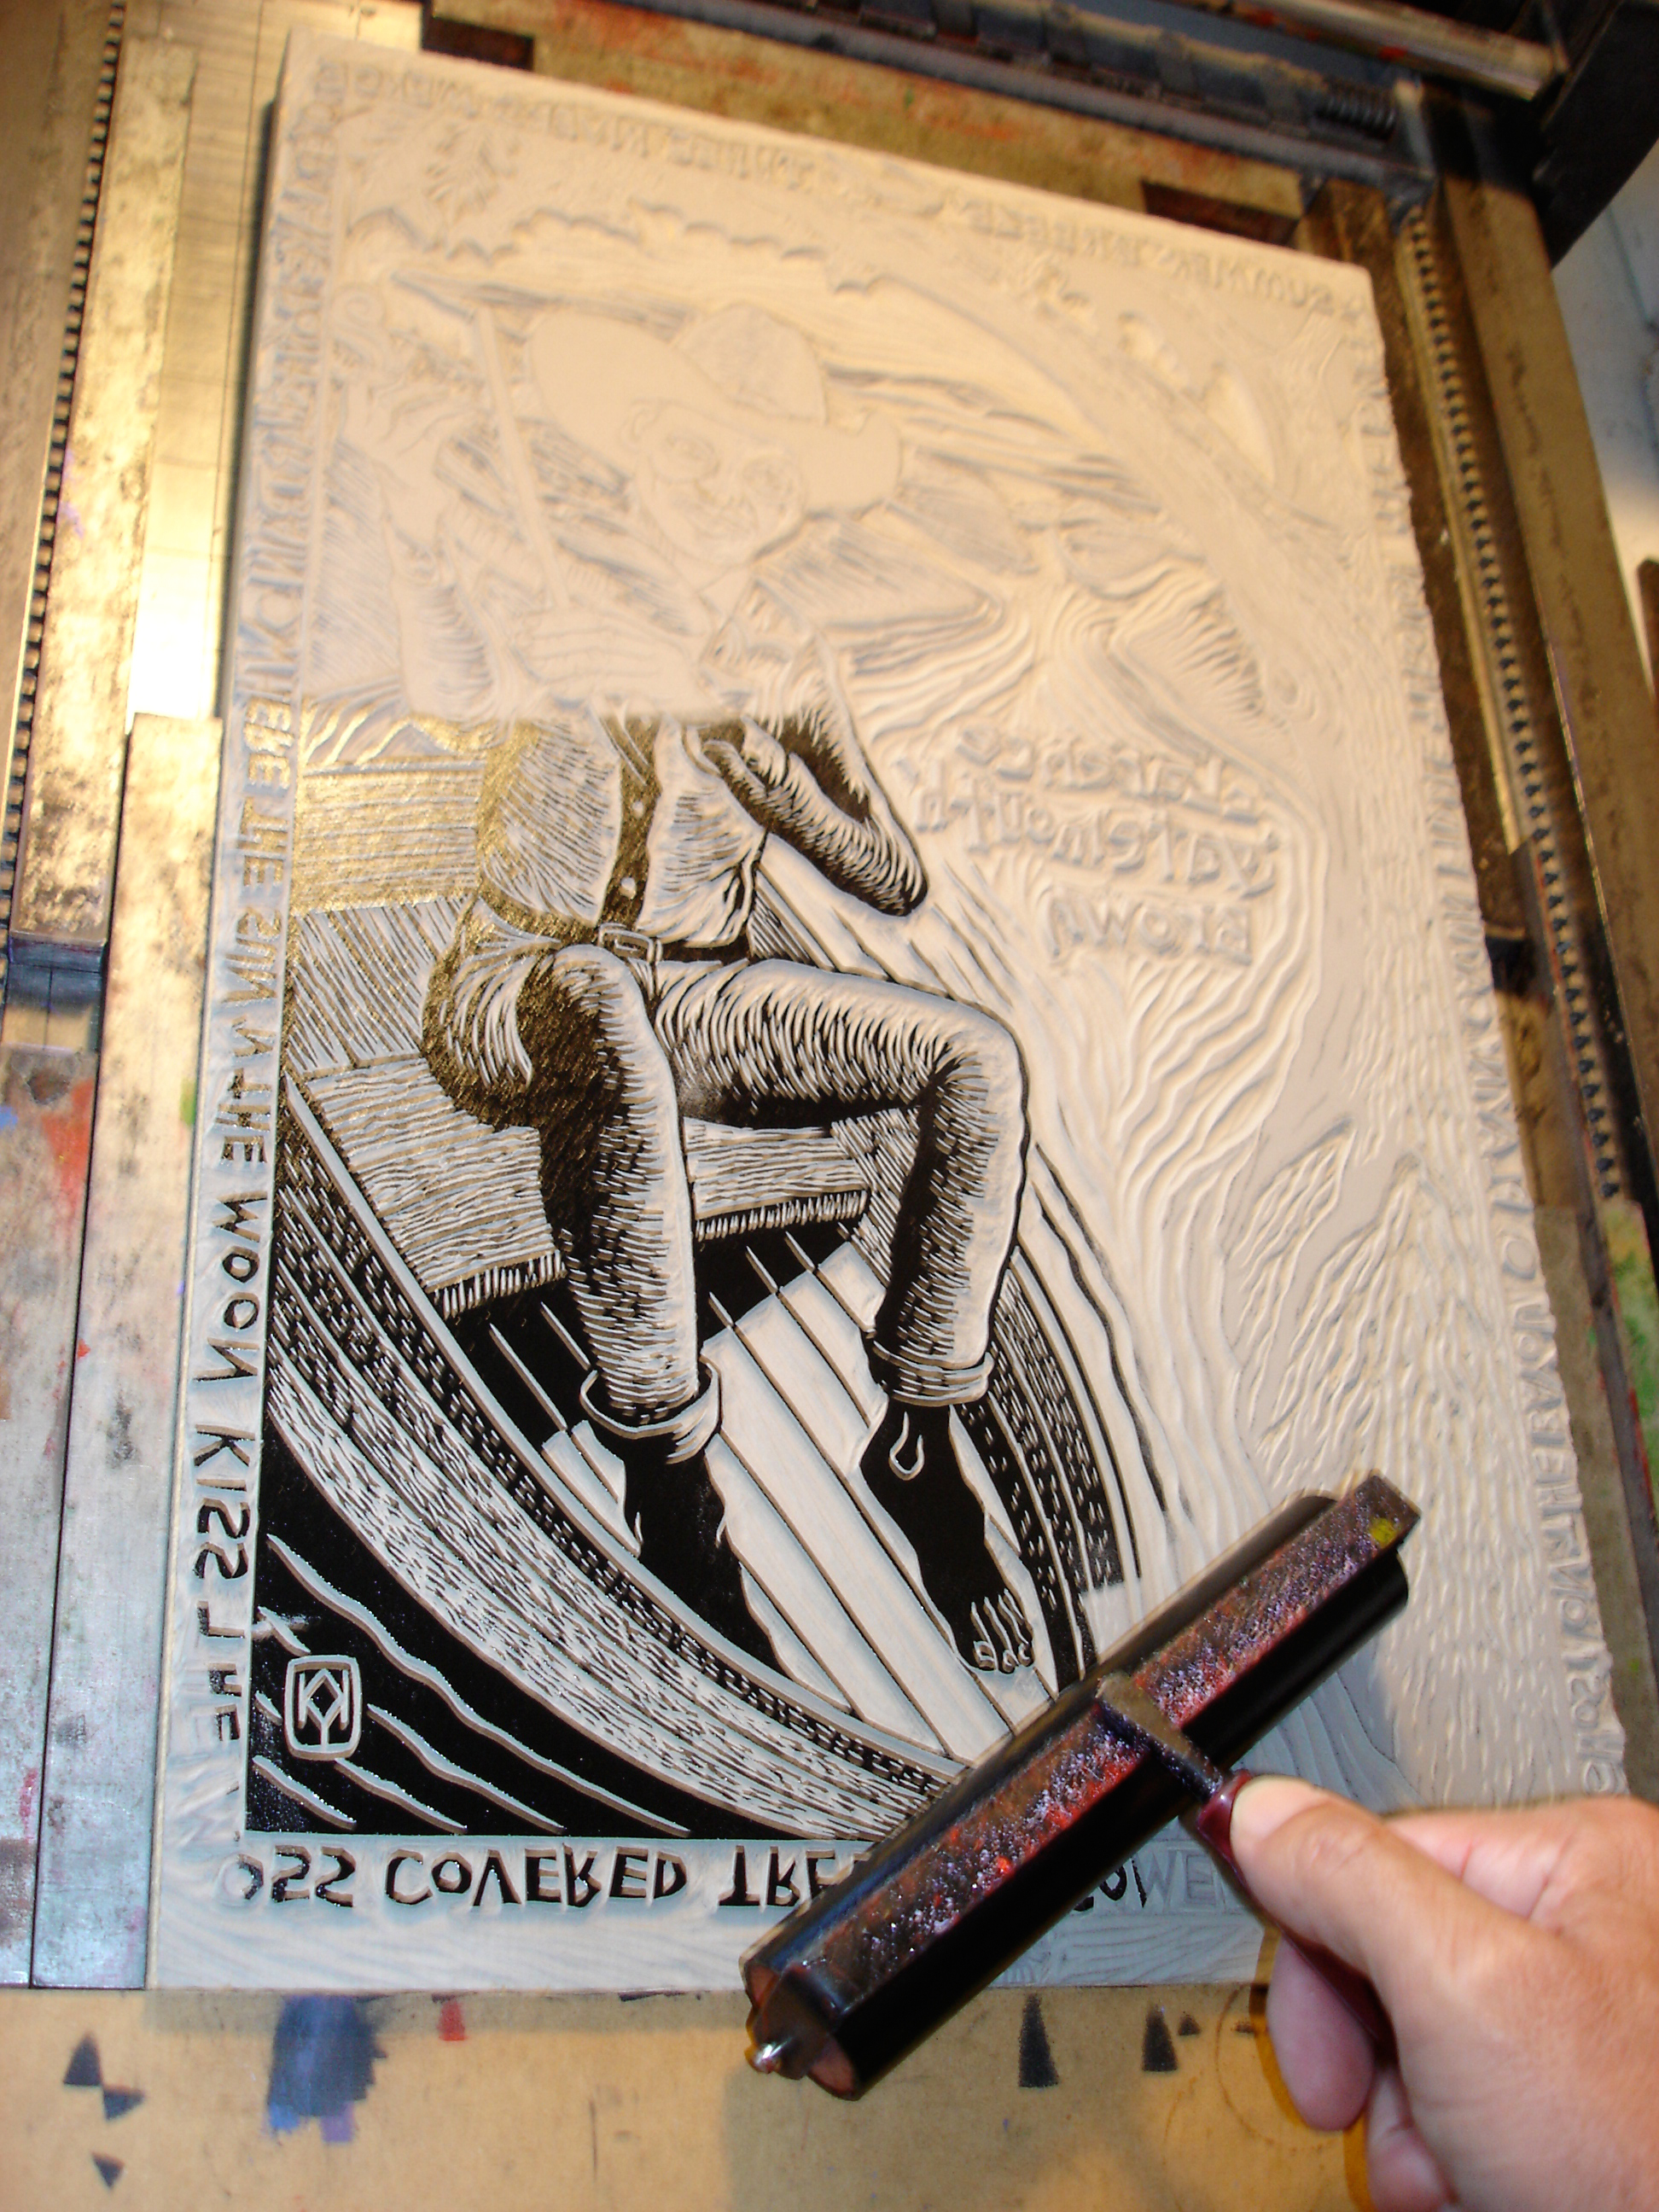
1. Yingst begins each idea foe a block print with a small thumbnail sketch, then draws a final draft to scale before transferring the image to the block. The drawing on the block is backward as the eventual print will be the mirror image.
Once the drawing is transferred, the block is carved using several V and U shaped gouges. Yingst said there are a number of strategies he uses when trying to break down an image into just black and white, including hatching, light and shadow, shape, texture, crosshatching or a stippling technique. In the end, whatever is cut away will be white while the surface of the block will print black or in color.
2. Once the block is carved to Yingst’s liking, the surface is inked with an oil-based ink, a paper is chosen and then both are hand-cranked through the press. The blocks that are too large for the press are burnished on the back using a large wooden spoon.
3. For multi-colored prints, an individual block is carved for every color. The print must align with the previous image and be pulled through the press multiple times. For some pieces, like the Clarence “Gatemouth” Brown print pictured here, the prints are individually painted using watercolors after printing. Prints are made in a limited edition series and the finished pieces are signed and numbered.
To view more of Kreg Yingst’s work, visit kregyingst.com.
Joe Hobbs / Glassblower


Joe Hobbs was born in Chattanooga, Tennessee but grew up in the Bahamas, Key West, Camarillo and Monterey, California. After studying briefly at the Rhode Island School of Design, Hobbs returned to California to study drawing and painting at California College of Arts in Oakland.
“I started blowing glass in college,” Hobbs said. “I took it as an elective. I thought it was going to be stained glass because I had never even heard of glassblowing before. The class description just said ‘glass.’ So, I took it.
I walked into the studio and I was instantly enamored. It was fire and molten glass. I was drawn to it immediately. I decided that was what I wanted to do.”
Hobbs first job was as an assistant in the glass production studio of Frank Cavaz in Sonoma, California.
“I just helped him make his work—bringing bits, bringing color. I was the low guy on the totem pole—sweeping floors and stuff like that—but I was getting paid and I learned a lot. From there, I did more jobs like that, and eventually, I had some wonderful opportunities to start studios and run studios.”
Hobbs talent and work ethic led to the opportunity to start the glass program at the Belmont Art Center in 2001.
“That was the beginning of the program here. That was total grassroots effort—I was hand-making the flyers for classes. It was just me until I recruited a couple friends to be my assistants.”
Hobbs ran the glass studio at the Belmont Arts Center (now First City Arts Center) for about eight years. During that time, he taught all of the classes and built the program into a very successful entity.
After going back to school at the University of West Florida to finish his Bachelor of Fine Arts, Hobbs was offered a job as a glass studio manager in Austin, Texas.
“I learned a lot about lighting there. I did that for a couple years and came back to Pensacola in 2015. I had accrued a lot of new skill sets, and so, since then, I’ve been doing a lot of lighting for local residences and businesses.”
Hobbs’ pieces always begin with an idea, a drawing and a plan.
“I’m lucky enough to be able to draw, and I’ve always loved it. So, I’ll have an idea and I will start doing some sketches. Since the art of glassblowing is expensive, I draw it all out first. That way, we are not wasting time. So, I draw out all of the steps and then I show my team. Next, we will make a couple of prototypes and see if it is achieving the ideal color pattern or shape I want. If we like those prototypes, then I’ll actually make some final pieces of that design. So, it goes form concept to drawing it out to prototyping to the finished piece. This can take two or three days, but I have worked on some concepts for years.
While Hobbs does like to plan out his work, ultimately, he loves the unpredictable nature of glassblowing.
“We can try to do everything exactly the same every time, but each piece is still going to come out a little bit different,” he said. “I like the inherent chaos that goes along with glass. That’s part of the allure of it—that you can only control up to so much. With my work, I like for there to be a little bit of happenstance.”
Hobbs also sees his work as a form of dialogue with the viewer—a shared experience that invites the viewer to make connections with the human condition, nature, memory and life.
The Process
1. Hobbs begins by preheating the end of the blowpipe and gathering clear molten glass out of the furnace. He takes the glass and pipe to the marver table to begin slowly pulling the glass from the end of the blowpipe. Next, he blows into the blowpipe and caps it to trap the air. Now he has a starter bubble.
An assistant cools the clear glass before adding the white overlay. As Hobbs applies the white overlay, he pushes it over the clear bubble, creating a white bubble of glass. This will become the interior of the vessel.
2. After working the white bubble to his liking, Hobbs and his team drop the exterior sunset colored overlay on top of the white interior. The color is transferred from a heating rod to the white glass.
Next, he works the color over the white at the marver table, continuing to center and shape the glass as he goes. Each color has a different melting point, which makes the overlay process a very difficult one to master.
3. Once the exterior color overlay pattern is covering the white glass completely, Hobbs uses rounded wooden blocks and blown air to continue to shape the piece. Once the colored overlay is even, Hobbs gathers more molten clear glass over it to enlarge the vessel.
4. Next Hobbs brings the piece to the bench where he blacks and shapes it even more. The rounded wooden blocks come in a variety of sizes for a variety of vessels. Hobbs is sure to quench the blocks continuously in order to preserve the blocks and keep the glass clean.
Using a combination of heating, rolling, shaping and blowing, Hobbs and his team slowly work the glass— blocking, blowing and gathering—continuing this process until the piece has reached the size and shape desired. It’s important to keep the rod spinning and the walls even during this process to ensure the structural integrity of the vessel.
5. Once the vessel is inflated, the team heats for the jack line, which is where the piece breaks off from the blowpipe. Hobbs uses gravity and a jack tool cut the glass free from the pipe as his team transfers the piece to a solid rod using a punty transfer.
Hobbs then trims the lip at the top of the vessel. An assistant uses a cone shaped soffietta to do some final inflating and shaping before disconnecting the piece from solid rod.
6. Next comes the final inflation of the vessel. Hobbs calls to his assistant to blow the rod at various intensities while he shapes the exterior of the glass using a thick pad of folded up newspapers soaked in water. The piece is now ready to sit in the annealer for 24 hours to slowly cool.
Once cool, Hobbs will smooth out the bottom and the sunset vessel will be ready for its close up.
Joe Hobbs was assisted by Jacob Moody and Cory Goodale for this piece.
Ann Taylor Duease / Jewelry Artist
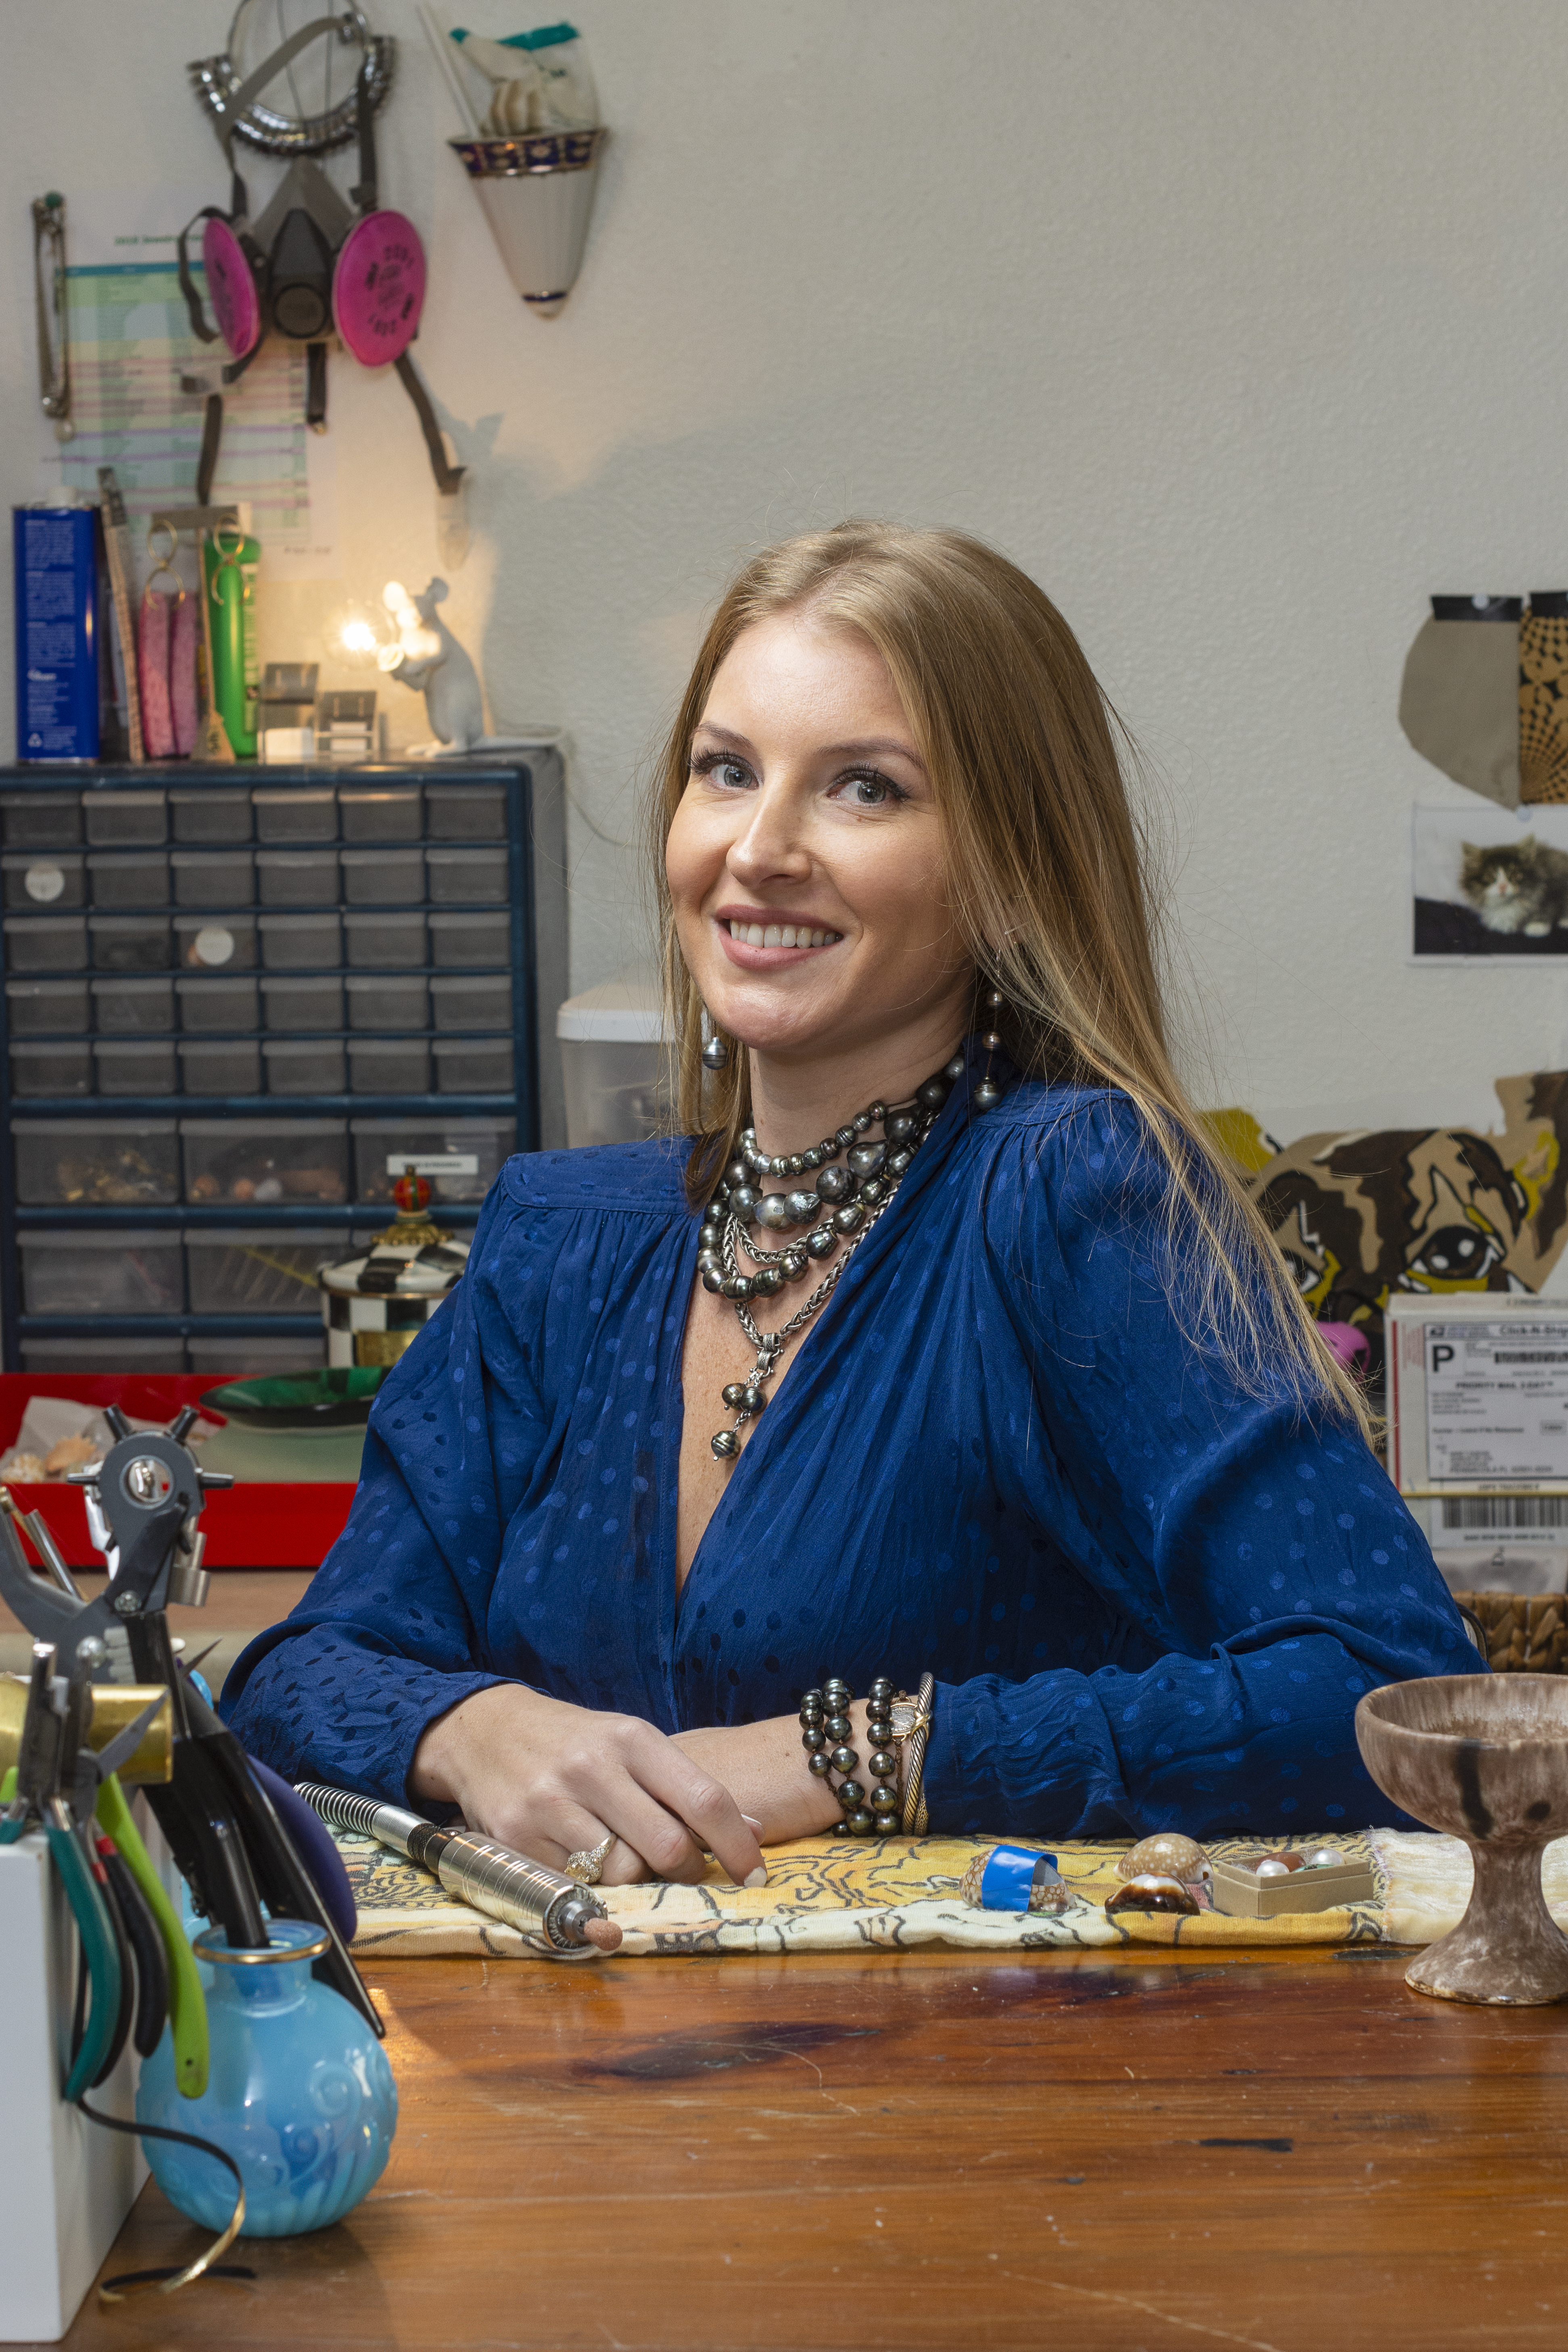
Anne Taylor Duease began her jewelrymaking odyssey in 2008. What started as a side hobby became a job in college and eventually, a career. Duease earned her bachelor’s degree in human sciences with a focus on merchandising and design and a minor in business. During her senior year, Duease apprenticed under a jewelry designer in New York, where she stayed for three years gaining valuable knowledge and contacts in the jewelry industry. In 2013, she decided to start her own business and her own line of jewelry.
After meeting and marrying a man from Pensacola, the couple moved here and Duease began working out of a studio at First City Art Center’s Gallery 1060. Duease finds her inspiration in nature and the coastal lifestyle.
“The initial attraction to pearls and shells comes from my fascination with working with naturally found materials,” she said. “I love being able to take that natural beauty and make it into something both wearable and beautiful.”
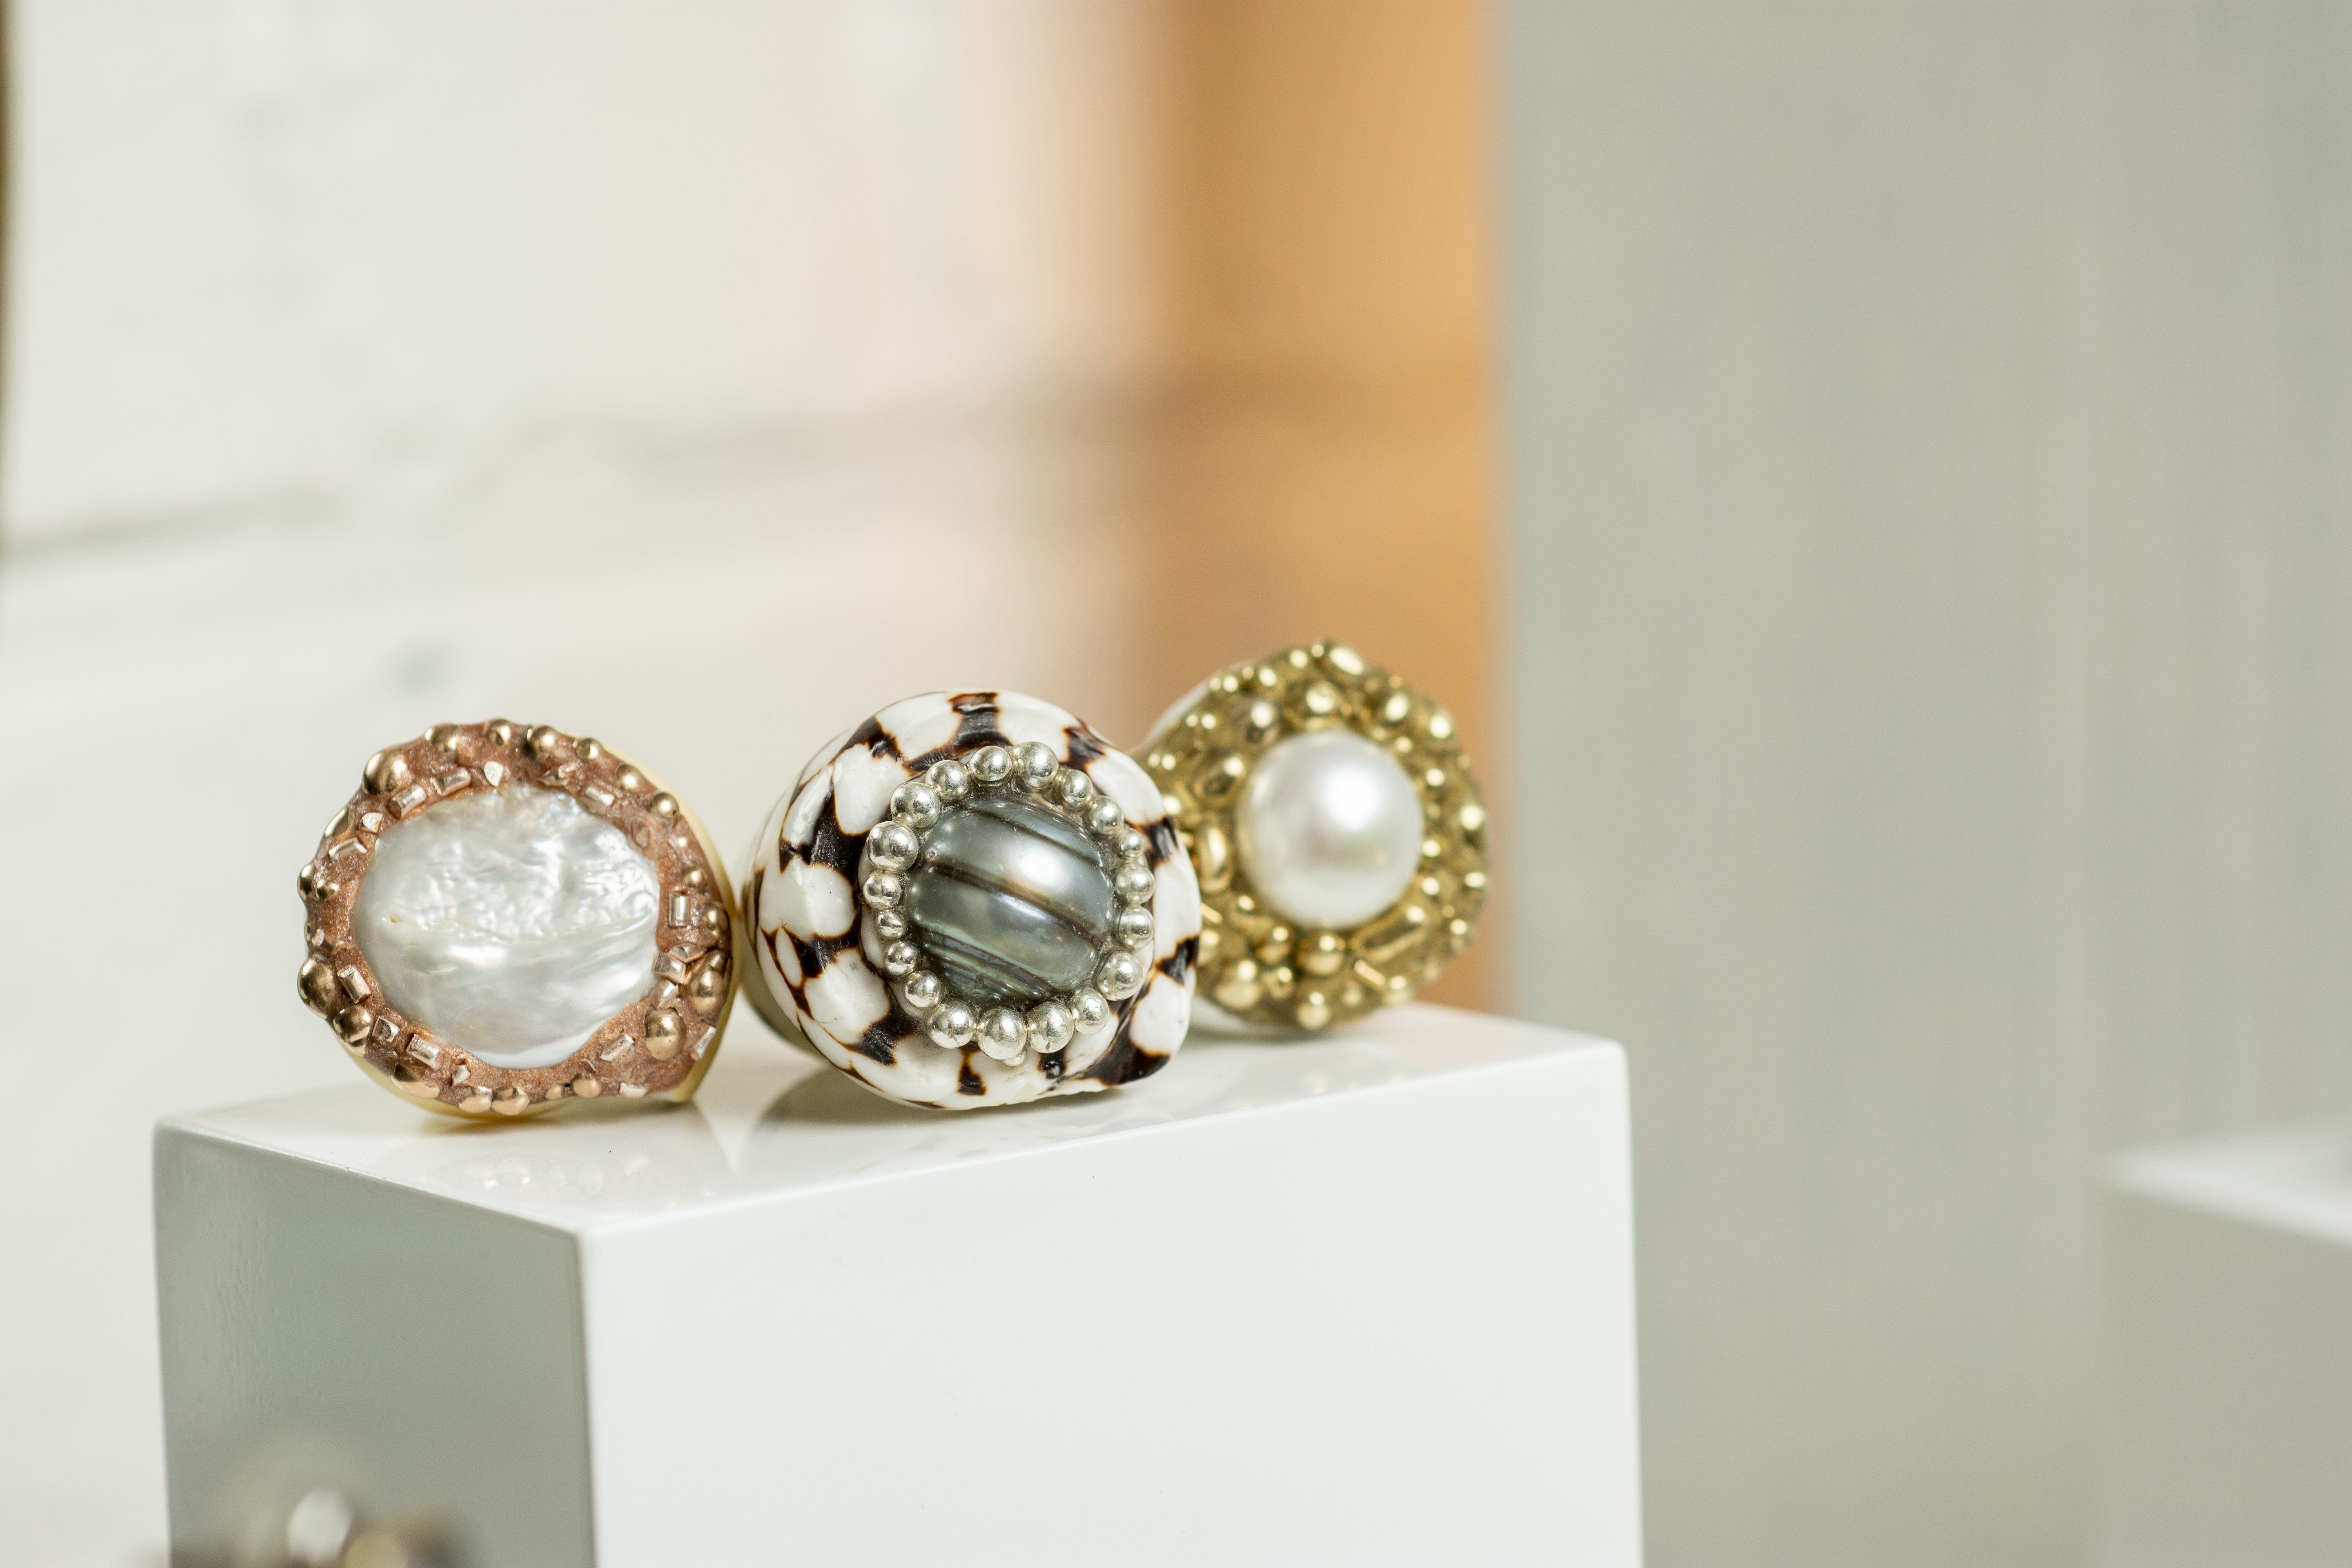
One very popular piece is Duease’s shell-based rings that combine semi-precious stones with pearls, gold and silver beading and precious metal clay. In addition to the coastal chic shell rings, Duease creates a wide variety of designs from freshwater, South Sea and Tahitian pearls along with natural stones like turquoise, larimar and moonstone.
“My pieces are very transitional,” Duease explained. “You can wear them during the day, but if you have to change your clothes for an event in the evening, you don’t necessarily have to change your jewelry. I like to make pieces that are very versatile and easily wearable. I love statement pieces, but I don’t want to feel the statement. I just want it to be seen. That’s a lot of my strategy in design. There’s also a little bohemian-luxe flair to my work with all of the natural elements. I’m drawn to the baroque and the more natural shapes. I really appreciate seeing all of the natural ridges and characteristics of how it was naturally created. Some people are drawn to the perfectly round pearls and I still use them, but I try to modernize it. So, if I do use a perfectly round pearl, I try to use something in the design that’s going to make it feel not so stuffy or uptight. Something that gives a little edge to a classic look.”
Recently written up in British Vogue as a designer to watch in 2020, Duease creates four different collections per year for wholesale accounts across the country. Working on her own in her studio at Gallery 1060, Duease creates each and every piece by hand.
As for process, Duease says it really depends on the piece, with some very structured and others coming to life more organically.
“Seashell rings are so unique because they are all different,” she said. “I generally map those out as I go, and each one takes about two days to complete. Collections, however, are very strategic, well thought out and thoroughly sketched in advance. They really have to be.”
Duease also follows the trends in jewelry design on social media, and she loves how the jeweler community shares tips and tricks for using various materials. This community is how she learned to use a heat gun rather than a kiln or oven for curing the precious metal clay, which burns away the clay leaving only the precious metal behind.
Duease is also an environmentalist at heart.
“This industry and fashion in general can be so wasteful,” she explained. “There is just so much excess, so I’m always trying to reuse anything and everything. Even if I bust a shell open or I crack a pearl, I’ll find a way to reuse it. I might set a stone inside the pearl or something like that.”
To see more of Anne Taylor Duease’s work, visit www. annetaylorduease.com and http://www.gallery1060.com/anntaylor-duease.
The Process
1. First Duease chooses her shell. She tends to use cowry, conus or trochus shells. Each has their own unique beauty and variety of patterns and colors. The trochus shells are the most fragile and can be hard to find in the right size.
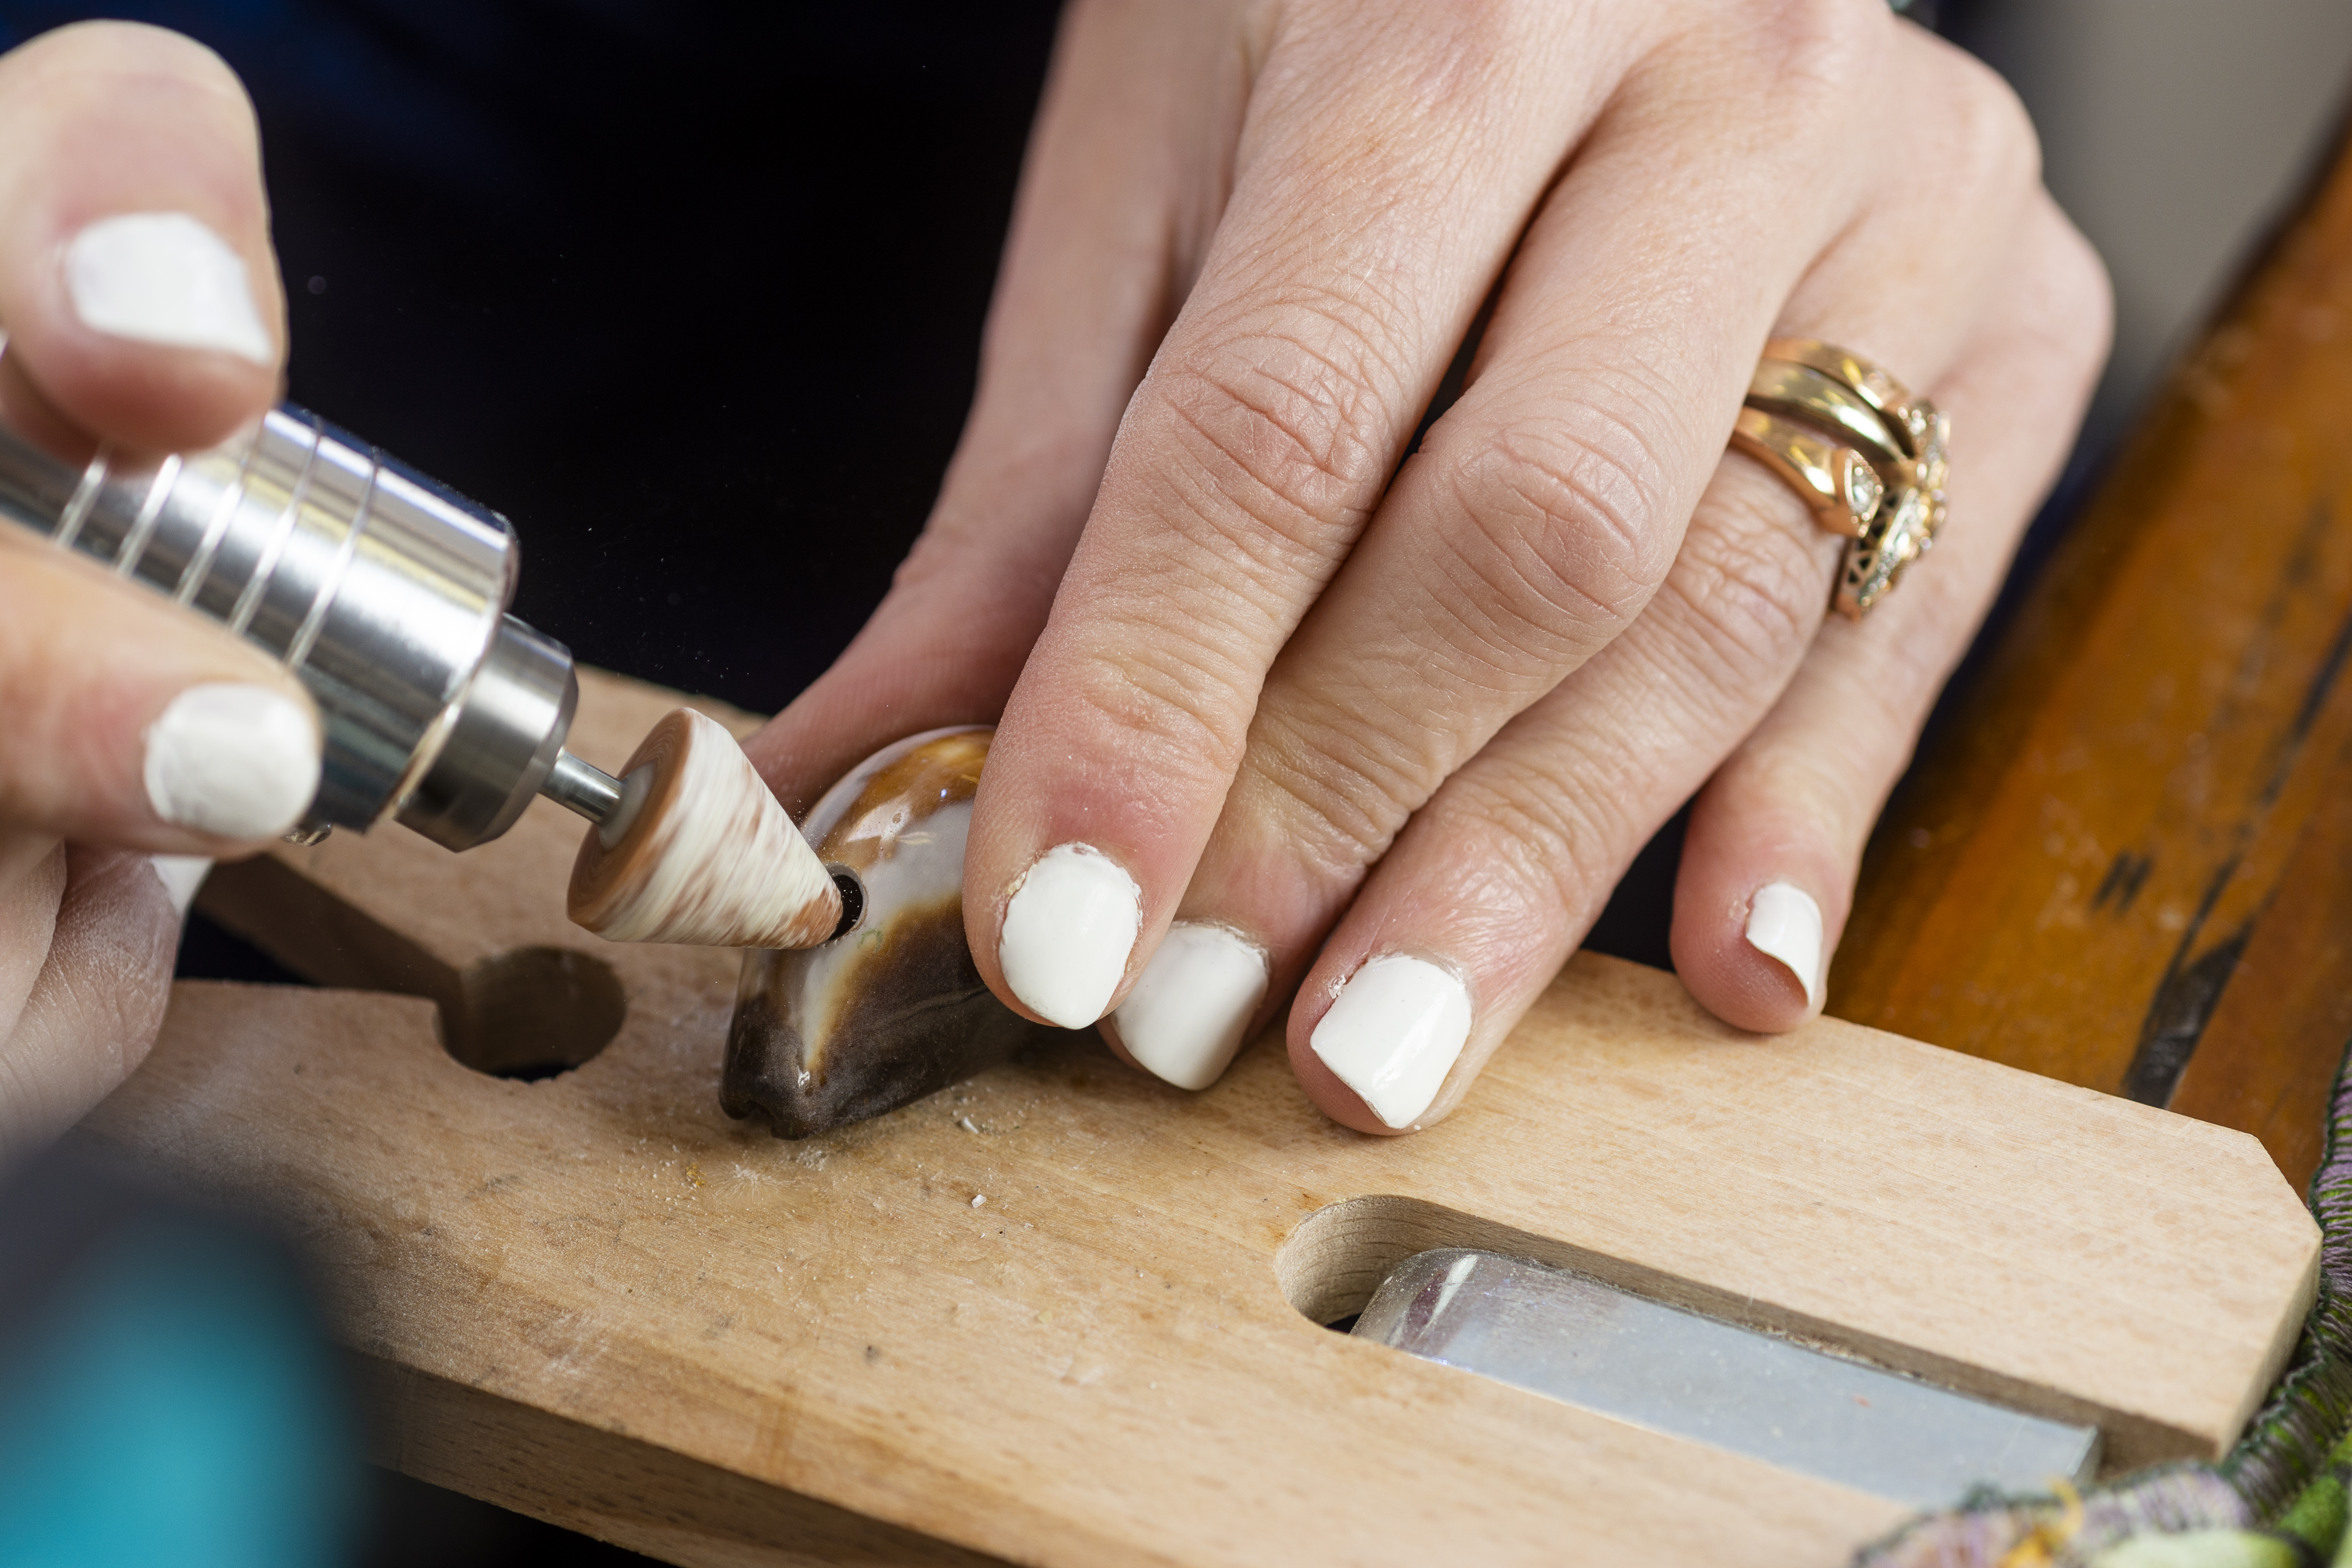
2. Next, she drills the shell noting that drilling each shell is different depending on hardness, shape and size. Duease looks at the shell, considering ring placement and any unique shapes before deciding where to drill the hole. She uses a pointed-tip grinding tool to begin the hole. The drilling must be done slowly to avoid any cracking, as the shells can be glass-like in terms of breaking into shards. As she drills, Duease gives the shell cold-water baths to keep it cool and to keep it from overheating and shattering. Once the hole is drilled, Duease uses a rounded grinding tool to round out and smooth the opening and the edges.
3. Satisfied with the shape and smoothness of the opening, Duease injects a proprietary epoxy agent to fill any vulnerable spaces within the shell and to strengthen the piece as a whole. While most women wear a size 7 or 7.5 ring, Duease’s shell rings are smoothed and sized to about a 6 or a 6.5 because it is much easier for her to widen a ring than it is to tighten one.
4. Once the epoxy dries and the ring is sized and finely smoothed, Duease measures the diameter of the shell and tapes off the cut line for the top of the ring. Then, first using a wheel cutter, she carefully etches out a line along the taped guideline. Then, using a diamond bit wheel, she cuts through the shell along the guideline. This is a very dusty process, so she is careful to wear a mask and cover her work area. Once the top is cut off, she uses a grinding wheel and a diamond bit to flatten out the top of the ring, making sure it is even and smooth.
5. Next, she drills a mounting hole through the top of the ring for whichever stone or pearl she plans to use and inserts a peg to hold the stone.
After placing the peg, she tapes off the top part of the shell and uses precious metal clay to create a base. Duease then maps the area for the main stone or pearl, but she doesn’t set it yet. To create texture, she places both metal casting grain beads and metal wire strands in her desired pattern, leaving room for the main setting. Duease continues to thinly layer the metal clay and metal pieces until she achieves the desired look.
6. She uses the heat gun to cure the precious metal clay. This process burns away the clay component leaving only the precious metals behind. When she is satisfied with her design, Duease sets the main stone or pearl and buffs the ring and setting to smooth and remove any dust.

Leave a comment